WeAuthn Sign-In Method
29 September 2022

Today we’re launching WebAuthn as a new sign-in method at Nhost.
You’re using Face ID or fingerprint to unlock your phone every day. Why not use it as a sign-in method for your application too? Well, now you can!
Live Demo: https://react-apollo.example.nhost.io/sign-up/security-key
Background
Most applications that require authentication still rely on passwords. However, passwords are becoming more and more notorious as poorly secured authentication methods.
Users face a dilemma:
- Should I use a long, complicated, "secure" password that I can barely remember?
- Should I use the name of my favourite pet followed by the year of my Mom's birthday?
Less security-conscious users will not even ask themselves such questions. They will go straight for their usual password to be sure not to forget it. We won't even talk about changing or resetting passwords… Long story short: securing passwords is hard and painful.
Other authentication methods address this tension between security and user experience and are already available at Nhost: OAuth (passing the password hot potato on to a third party service), or passwordless authentication by sending a Magic Link via email or a one-time password via SMS.
Still, it can be tedious for users to constantly check their email for a Magic Link or to look it up on their phone and manually enter a four-digit code. In terms of security, these methods are still vulnerable to phishing and other man-in-the-middle attacks.
WebAuthn
Security fanatics and UX advocates finally met at the FIDO Alliance and the W3C, and developed the FIDO2 project to solve this problem: the WebAuthn standard was born.
 WebAuthn
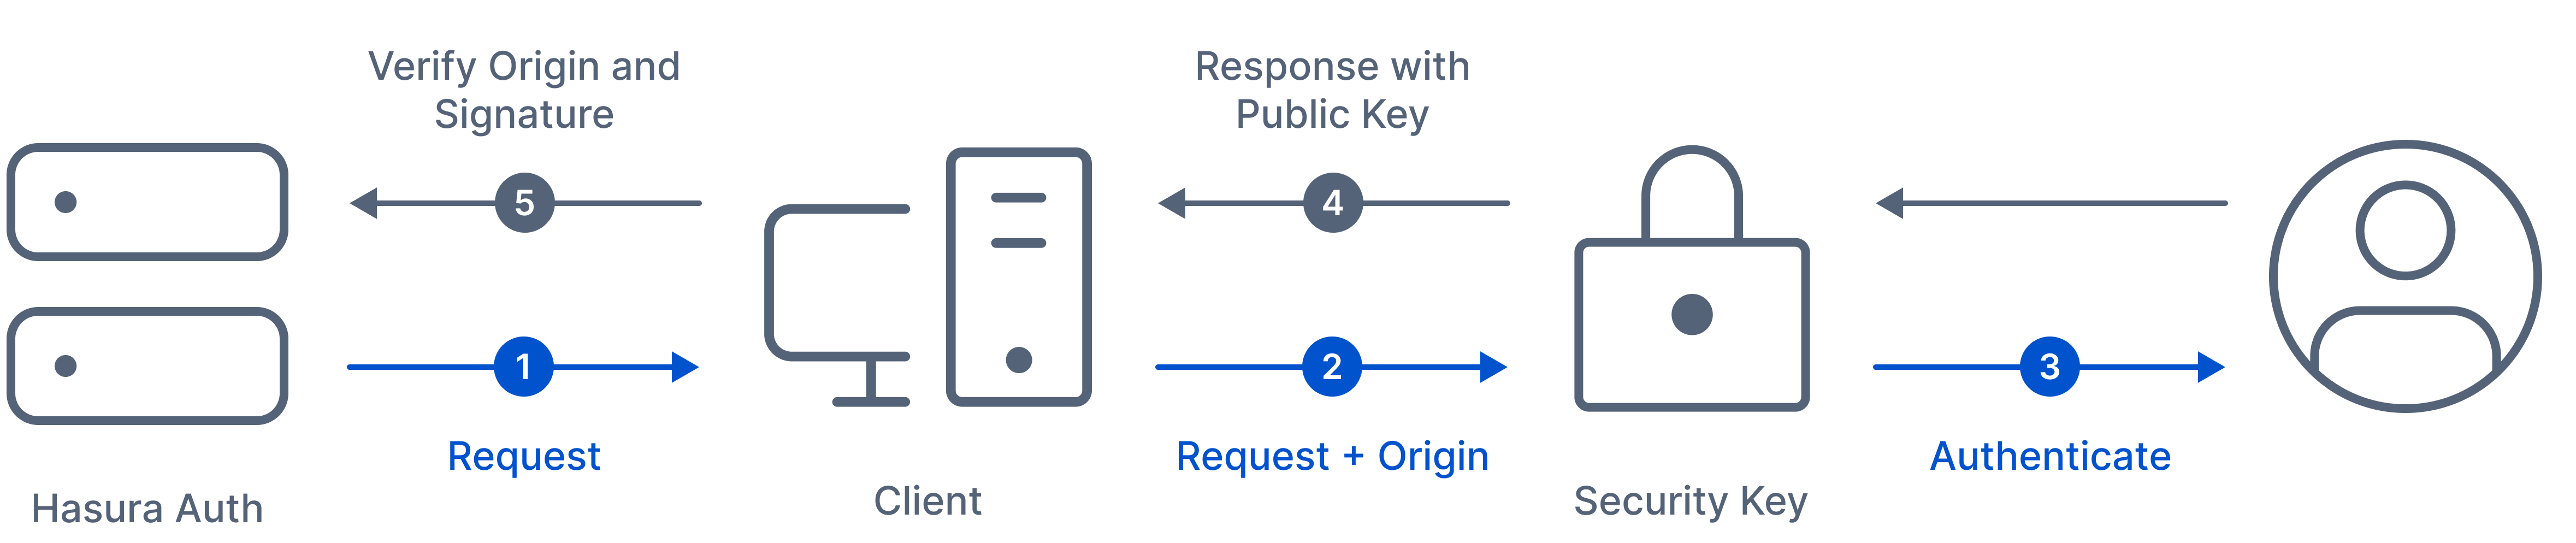
With WebAuthn, you can verify users with a specific device and something they know (a PIN, a swipe pattern) or something they are (fingerprint, face, or voice recognition…).
Since its release as a W3C recommendation in 2019, WebAuthn has been widely adopted by all the leading web browsers, including Apple (Touch ID, FaceID), Yubico, and others. It is backed by big names like Google, Mozilla, and Microsoft. Big companies are already using it in their applications, e.g. GitHub, Google, Microsoft, Facebook, Tesla, ProtonMail, Bitwarden, etc.
WebAuthn is often used as a second-factor authenticator, although it is considered secure as a single factor. We did the latter at Nhost.
How it works
Enable security keys in your project
To enable the use of security keys from the Nhost cloud.
- Go to your project settings.
- Enable Security Keys.
- Click Save.
Don't forget to check your Client URL setting is pointing to your frontend, as WebAuthn will check it and fail if the request is sent from another domain.
When using the Nhost CLI, you can activate the feature locally by adding the following parameters to their config.yaml file:
_10auth:_10 webauthn:_10 enabled: true_10 rp_name: My application
You have to make sure you are using the latest version of the CLI in running sudo nhost upgrade.
Signing up
Signing up with a security key uses the same method as signing up with an email and a password. Instead of a password parameter, you need to set the securityKey parameter to true:
_16const { error, session } = await nhost.auth.signUp({_16 email: 'joe@example.com',_16 securityKey: true,_16})_16_16if (error) {_16 // Something unexpected happened, for instance, the user canceled their registration_16 console.log(error)_16} else if (session) {_16 // Sign up is complete!_16 console.log(session.user)_16} else {_16 console.log(_16 'You need to verify your email address by clicking the link in the email we sent you.',_16 )_16}
In our React-Apollo example, it looks like this:
Signing in
Once a user added a security key, they can use it to sign in:
_10const { error, session } = await nhost.auth.signIn({_10 email,_10 securityKey: true,_10})_10if (session) {_10 // User is signed in_10} else {_10 // Something unexpected happened_10 console.log(error)_10}
Here is how it goes in our React-Apollo example:
Adding a security key
Any signed-in user with a valid email can add a security key when the feature is enabled. For instance, someone who signed up with an email and a password can add a security key and thus use it for their later sign-in!
Users can use multiple devices to sign in to their account. They can add as many security keys as they like.
_10const { key, error } = await nhost.auth.addSecurityKey()_10if (key) {_10 // Successfully added a new security key_10 console.log(key.id)_10} else {_10 // Somethine unexpected happened_10 console.log(error)_10}
A nickname can be added for each security key to make them easy to identify:
_10await nhost.auth.addSecurityKey('my macbook')
Here's what it looks like in our React-Apollo example with Apple's Touch ID:
You noticed the above example lists the user's security keys and allows users to delete the ones they choose. It can be achieved over GraphQL after setting the correct permissions. You can have a look at the source code to get some inspiration. It’s recommended to allow users to list and delete their security keys.
React hooks
In addition to the JavaScript SDK, the security key feature is also exposed in @nhost/react using hooks. You can browse the code of our React-Apollo example to find out how we implemented it with Mantine.
Signing up
_21import { useSignUpSecurityKeyEmail } from '@nhost/react'_21_21export const SecurityKeySignUp: React.FC = () => {_21 const { signUpEmailSecurityKey } = useSignUpEmailSecurityKey()_21 const [email, setEmail] = useState('')_21_21 const signIn = async (e: FormEvent<HTMLFormElement>) => {_21 e.preventDefault()_21 const { isError, needsEmailVerification, isSuccess } =_21 await signUpSecurityKeyEmail(email)_21 if (isError) {_21 // Something unexpected happended_21 } else if (needsEmailVerification) {_21 // Email needs verification_21 } else if (isSuccess) {_21 // Signed up successfully_21 }_21 }_21_21 return <div>my component</div>_21}
Signing in
_21import { useSignInSecurityKeyEmail } from '@nhost/react'_21_21export const SecurityKeySignIn: React.FC = () => {_21 const { signInSecurityKeyEmail } = useSignInEmailSecurityKey()_21 const [email, setEmail] = useState('')_21_21 const signIn = async (e: FormEvent<HTMLFormElement>) => {_21 e.preventDefault()_21 const { isError, isSuccess, needsEmailVerification, error } =_21 await signInSecurityKeyEmail(email)_21 if (isError) {_21 // Something unexpected happended_21 } else if (needsEmailVerification) {_21 // Email needs verification_21 } else if (isSuccess) {_21 // Signed in successfully_21 }_21 }_21_21 return <div>my component</div>_21}
Adding a security key
We implemented a useAddSecurityKey hook that works in a similar way as nhost.auth.addSecurityKey. The add action will execute the WebAuthn choreography to register a new security key for the currently authenticated user:
_19import { useAddSecurityKey, useUserId } from '@nhost/react'_19_19export const SecurityKeys: React.FC = () => {_19 const { add } = useAddSecurityKey()_19 // Nickname of the security key_19 const [nickname, setNickname] = useState('')_19_19 const addKey = async (e: React.FormEvent<HTMLFormElement>) => {_19 e.preventDefault()_19 const { key, error } = await add(nickname)_19 if (error) {_19 // Something unexpected happened_19 } else if (key) {_19 // Sucessfully added the security key_19 }_19 }_19_19 return <div>my component</div>_19}
The React-Apollo example also shows how users can list and remove their security keys through the GraphQL API.
How we did it
Open Source Contributions
Hasura Auth is the Hasura side-car authentication service. Hasura Auth is open-source, as well as all the other services in the Nhost stack. Although we are happy to share with the community, we are doing our best to encourage contributions. With WebAuthn, this is precisely what happened. We didn't initially put this feature on top of the Nhost team's priorities. Some of our users started suggesting on Discord we could integrate Nhost with WebAuthn. Asen Lekov, one of our most active external contributors, took the initiative to work on a comprehensive pull request. After some review and work with our SDK, we had a fancy new feature for the users, brought out by our users!
Database Schema
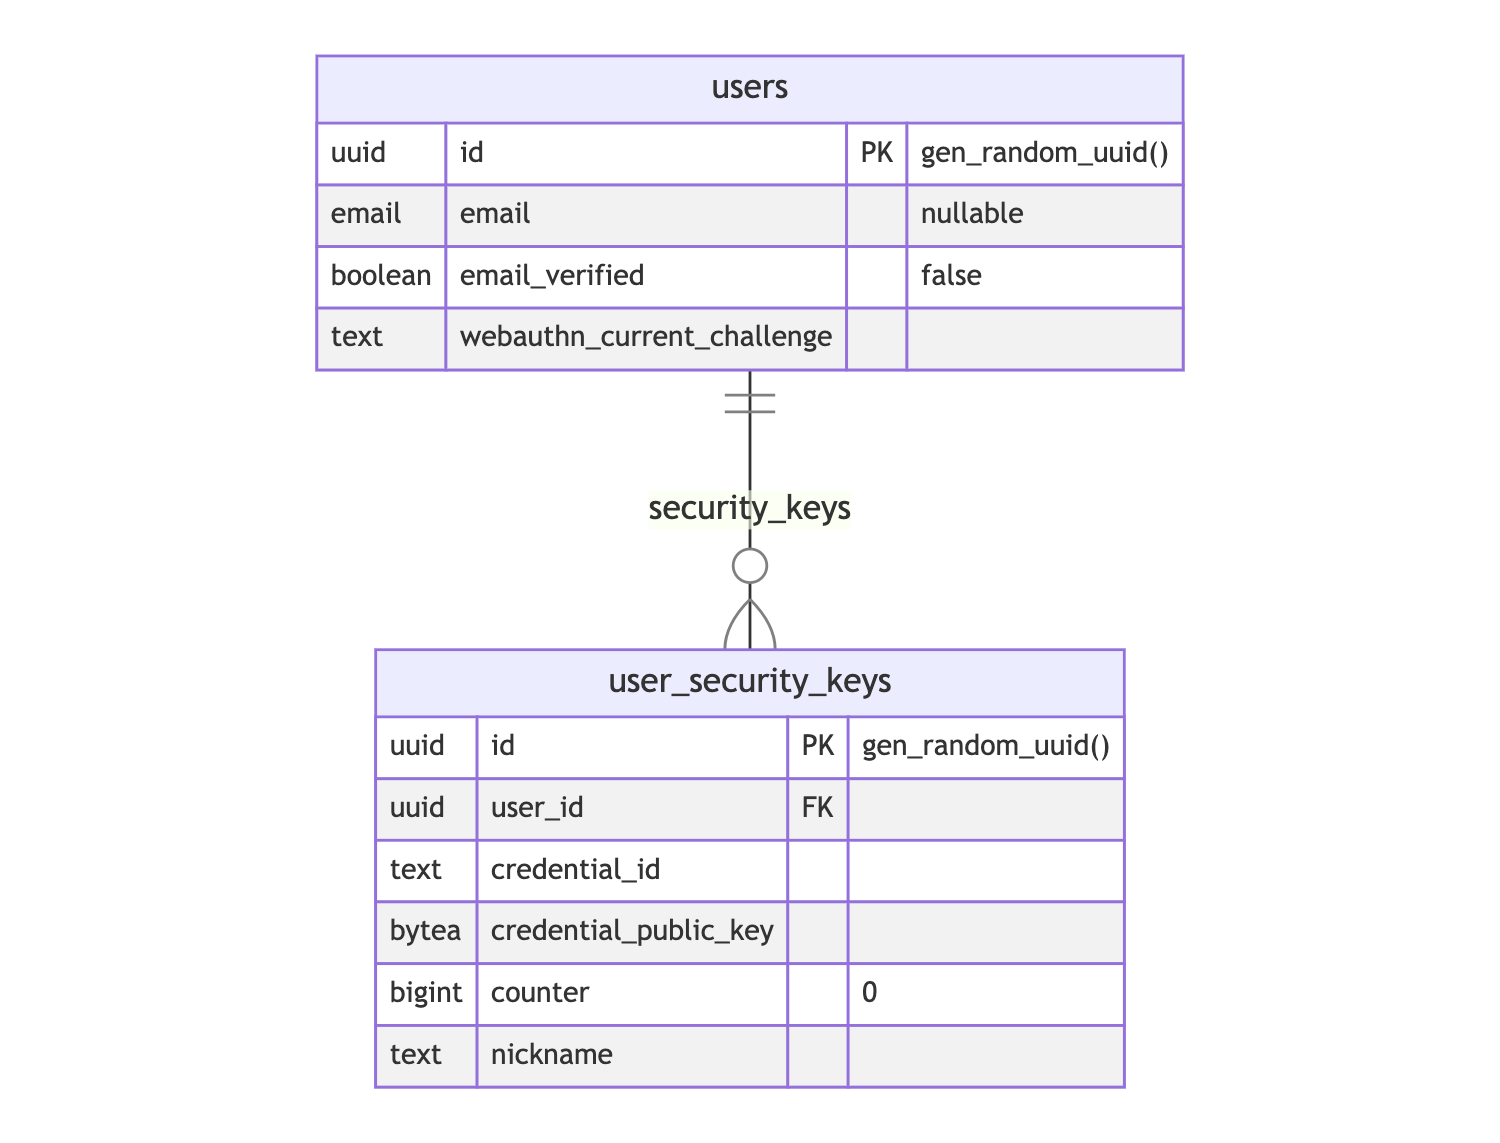
First of all, the Hasura Auth database schema introduces a new user_security_keys table as it should be possible for users to add as many security keys as they like. Each security key stores a credential ID as well as the public key that will be required when verifying the device.
 Database Schema
The counter column contains the number of times the security key reports it has been used. It is used to prevent relay attacks. We also added a nickname column so the user can give a human-readable name to the security key, which can be especially useful when using several security devices. It is optional and is not involved in the WebAuthn registration and authentication processes.
Backend workflows
In any authentication workflow, we need a unique user identifier. In Hasura Auth, there are three: the id, which is an internal UUID, the email, that is used in most authentication methods (password, Magic Link, OAuth, etc.) and a phone_number, used when signing in with an OTP code sent by SMS.
We haven't implemented a username, so we used the email as the WebAuthn user identifier in this first release.
Sign up
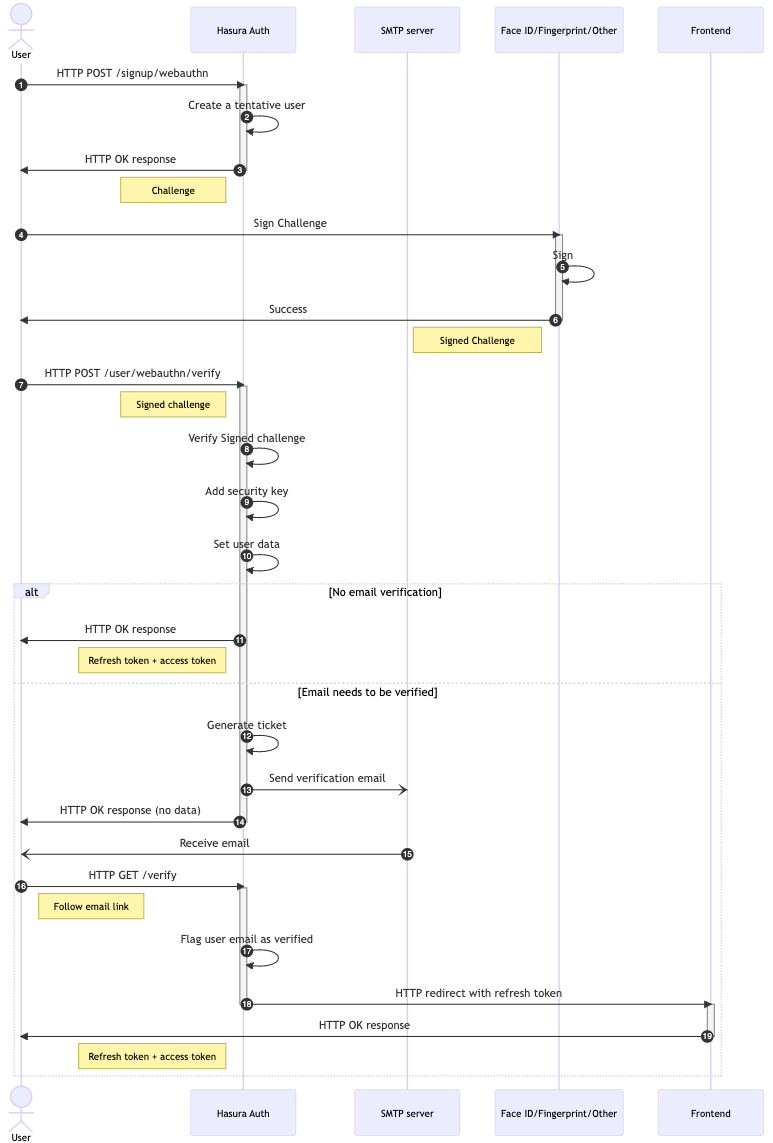
The overall WebAuthn sign-up workflow is similar to the email + password sign-up workflow. After the user completes the registration of their email and security key, it will return the session unless the email needs to be verified first. In this latter case, a verification email is sent, and the user can finally sign up once the email link is clicked and processed.
 Sign Up
Sign in
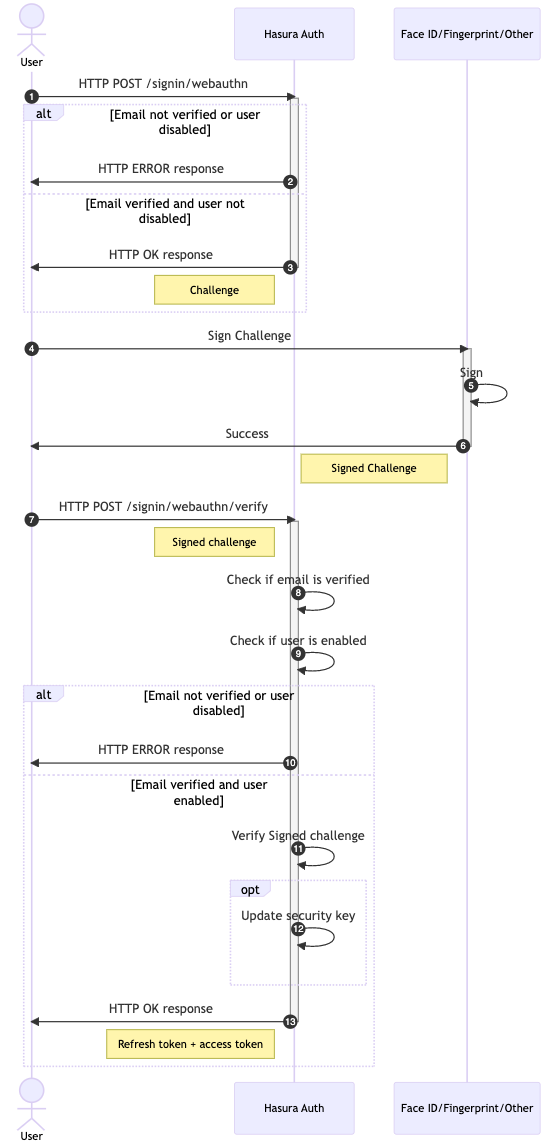 Sign In
Add a new security key
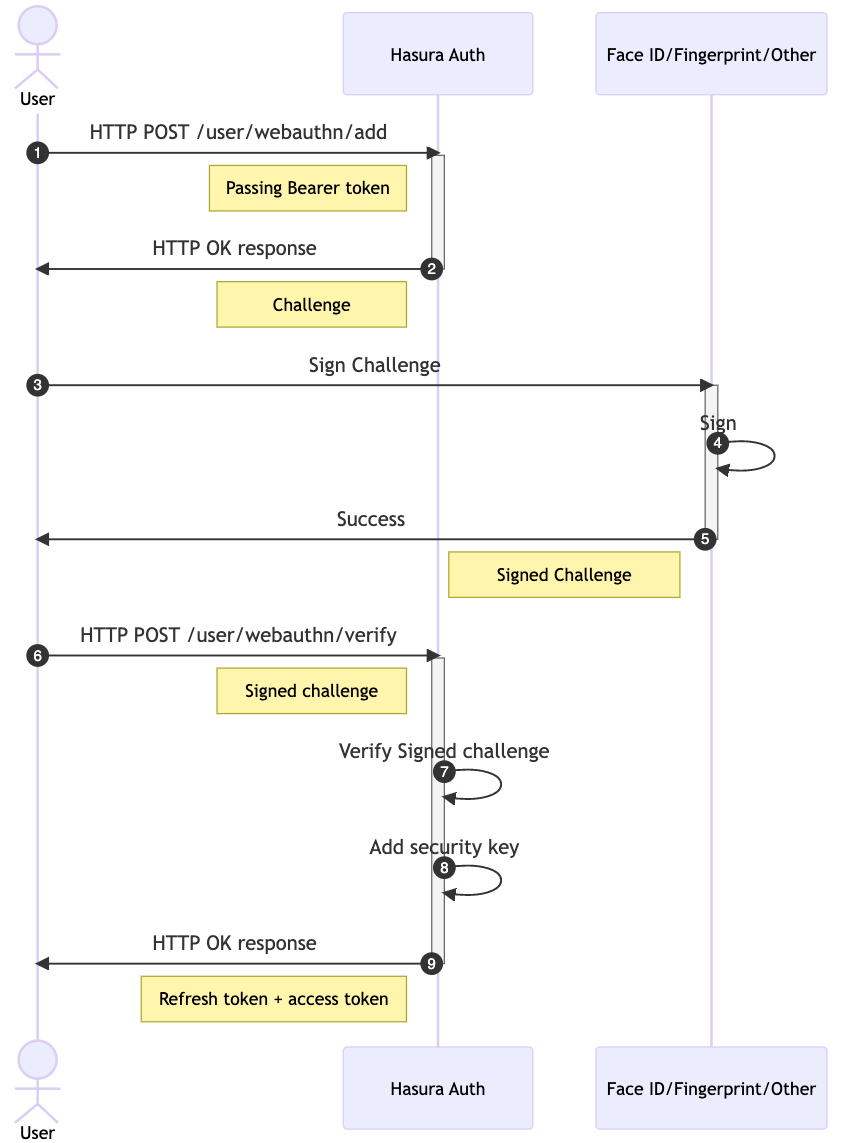 Add a new security key
What's next?
- WebAuthn can also be used in a “usernameless” mode: users wouldn't even need to enter their email address, but would instead suggest selecting which account to connect to from a list of accounts that registered with the same security key. Here is a demo that illustrates the pattern.
- We implemented the WebAuthn feature in the VanillaJS Nhost client as well as in React hooks. We will work on Vue3 composables in the near future, which will follow the same logic as the React hooks.
- We started the WebAuthn journey with an open-source contribution: share your ideas, suggestions, and code so we can improve this feature together!
PS. Support our Open Source work
External resources
- Curity's WebAuthn Overview
- 45' minutes video by James Fang and Payal Pan from Okta in 2019 (the list of browsers that support WebAuthn dramatically increased since)
- Yubico WebAuthn Developer Guide
Share this post