Nhost: Understanding the basics
20 May 2022


Let's create a simple todo-app using Nhost. With this app, a user will be able to create and list its own todos and not have anyone else see them.
To implement this behavior with Nhost, we'll briefly cover the following topics:
- Creating a new app on Nhost
- Defining a database schema
- Inserting data
- Setting permissions
- Querying data via the GraphQL API
By the end of this tutorial, you will better understand what Nhost is and what it does for you.
Log in to Nhost
Go to app.nhost.io and sign up for a new account if you don't have one already.
Create app
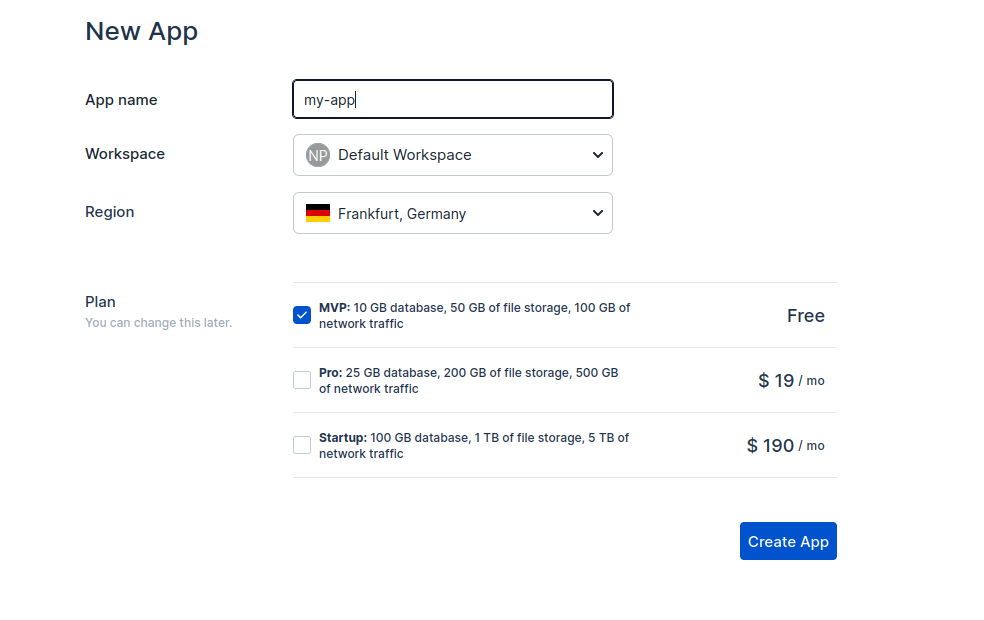
Press the New App button on the console's home page. Choose a name and pick the region closest to your users.
You'll be all set with the Default Workspace and the Free plan for now.
 New App
Creating a new app takes around 20 seconds or so. During this time, Nhost sets up your app's entire backend and infrastructure.
Once the setup completes, you'll automatically see the app dashboard, and you're ready to define your app's database schema.
Now, you will write a small JavaScript client to interact and retrieve todos from your Nhost app.
Frontend frameworks
Nhost is framework-agnostic and works with any frontend you might build. You can also connect to Nhost from your server-side if you wish.
In this guide, we'll keep the example simple. We're not using a frontend framework. In a real-life scenario, you'd probably build a frontend client with a framework such as React, Vue, Svelte, or React Native.
Setup
Make sure you have Node.js and npm or Yarn installed.
Create a new folder called nhost-todos, initialize a new JavaScript app there, and install the Nhost JavaScript SDK:
_10npm init -y_10npm install @nhost/nhost-js graphql
or with Yarn
_10yarn init -y_10yarn add @nhost/nhost-js graphql
You might have to edit the package.json file and add/change the type object to module ("type": "module").
Initialize Nhost
In the new directory, create a file called index.js.
Enter the following code into this file. It will initialize a new JavaScript client that will interact with your backend:
_10import { NhostClient } from '@nhost/nhost-js'_10_10const nhost = new NhostClient({_10 backendUrl: 'https://[app-subdomain].nhost.run', // replace this with the backend URL of your app_10})_10_10console.log(nhost.graphql.getUrl())
Run the code in your terminal. You should see your app's GraphQL endpoint URL:
_10➜ node index.js_10_10https://[app-subdomain].nhost.run/v1/graphql
Query todos
If you now add the following GraphQL query to the client, let's see what happens when you run the updated version:
_20import { NhostClient } from '@nhost/nhost-js'_20_20const nhost = new NhostClient({_20 backendUrl: 'https://[app-subdomain].nhost.run',_20})(async () => {_20 // nhost.graphql.request returns a promise, so we use await here_20 const todos = await nhost.graphql.request(`_20 query {_20 todos {_20 id_20 created_at_20 name_20 is_completed_20 }_20 }_20 `)_20_20 // Print todos to console_20 console.log(JSON.stringify(todos.data, null, 2))_20})()
_10➜ node index.js_10_10null
null is printed. Why is that? Let's find out.
While using the Hasura Console, you could fetch the todos because the admin role is enabled by default but when building your applications with a client, you want to define permissions using roles that your users can assume when making requests.
Hasura supports role-based access control. You create rules for each role, table, and operation (select, insert, update and delete) that can check dynamic session variables, like user ID.
Unauthenticated users
Use the public role in permissions when you want some data to be accessed by anyone without being signed in. The public role is the default role in all unauthenticated requests.
Generally speaking, the public role should not have permission to insert, update or delete data.
Setting public permissions
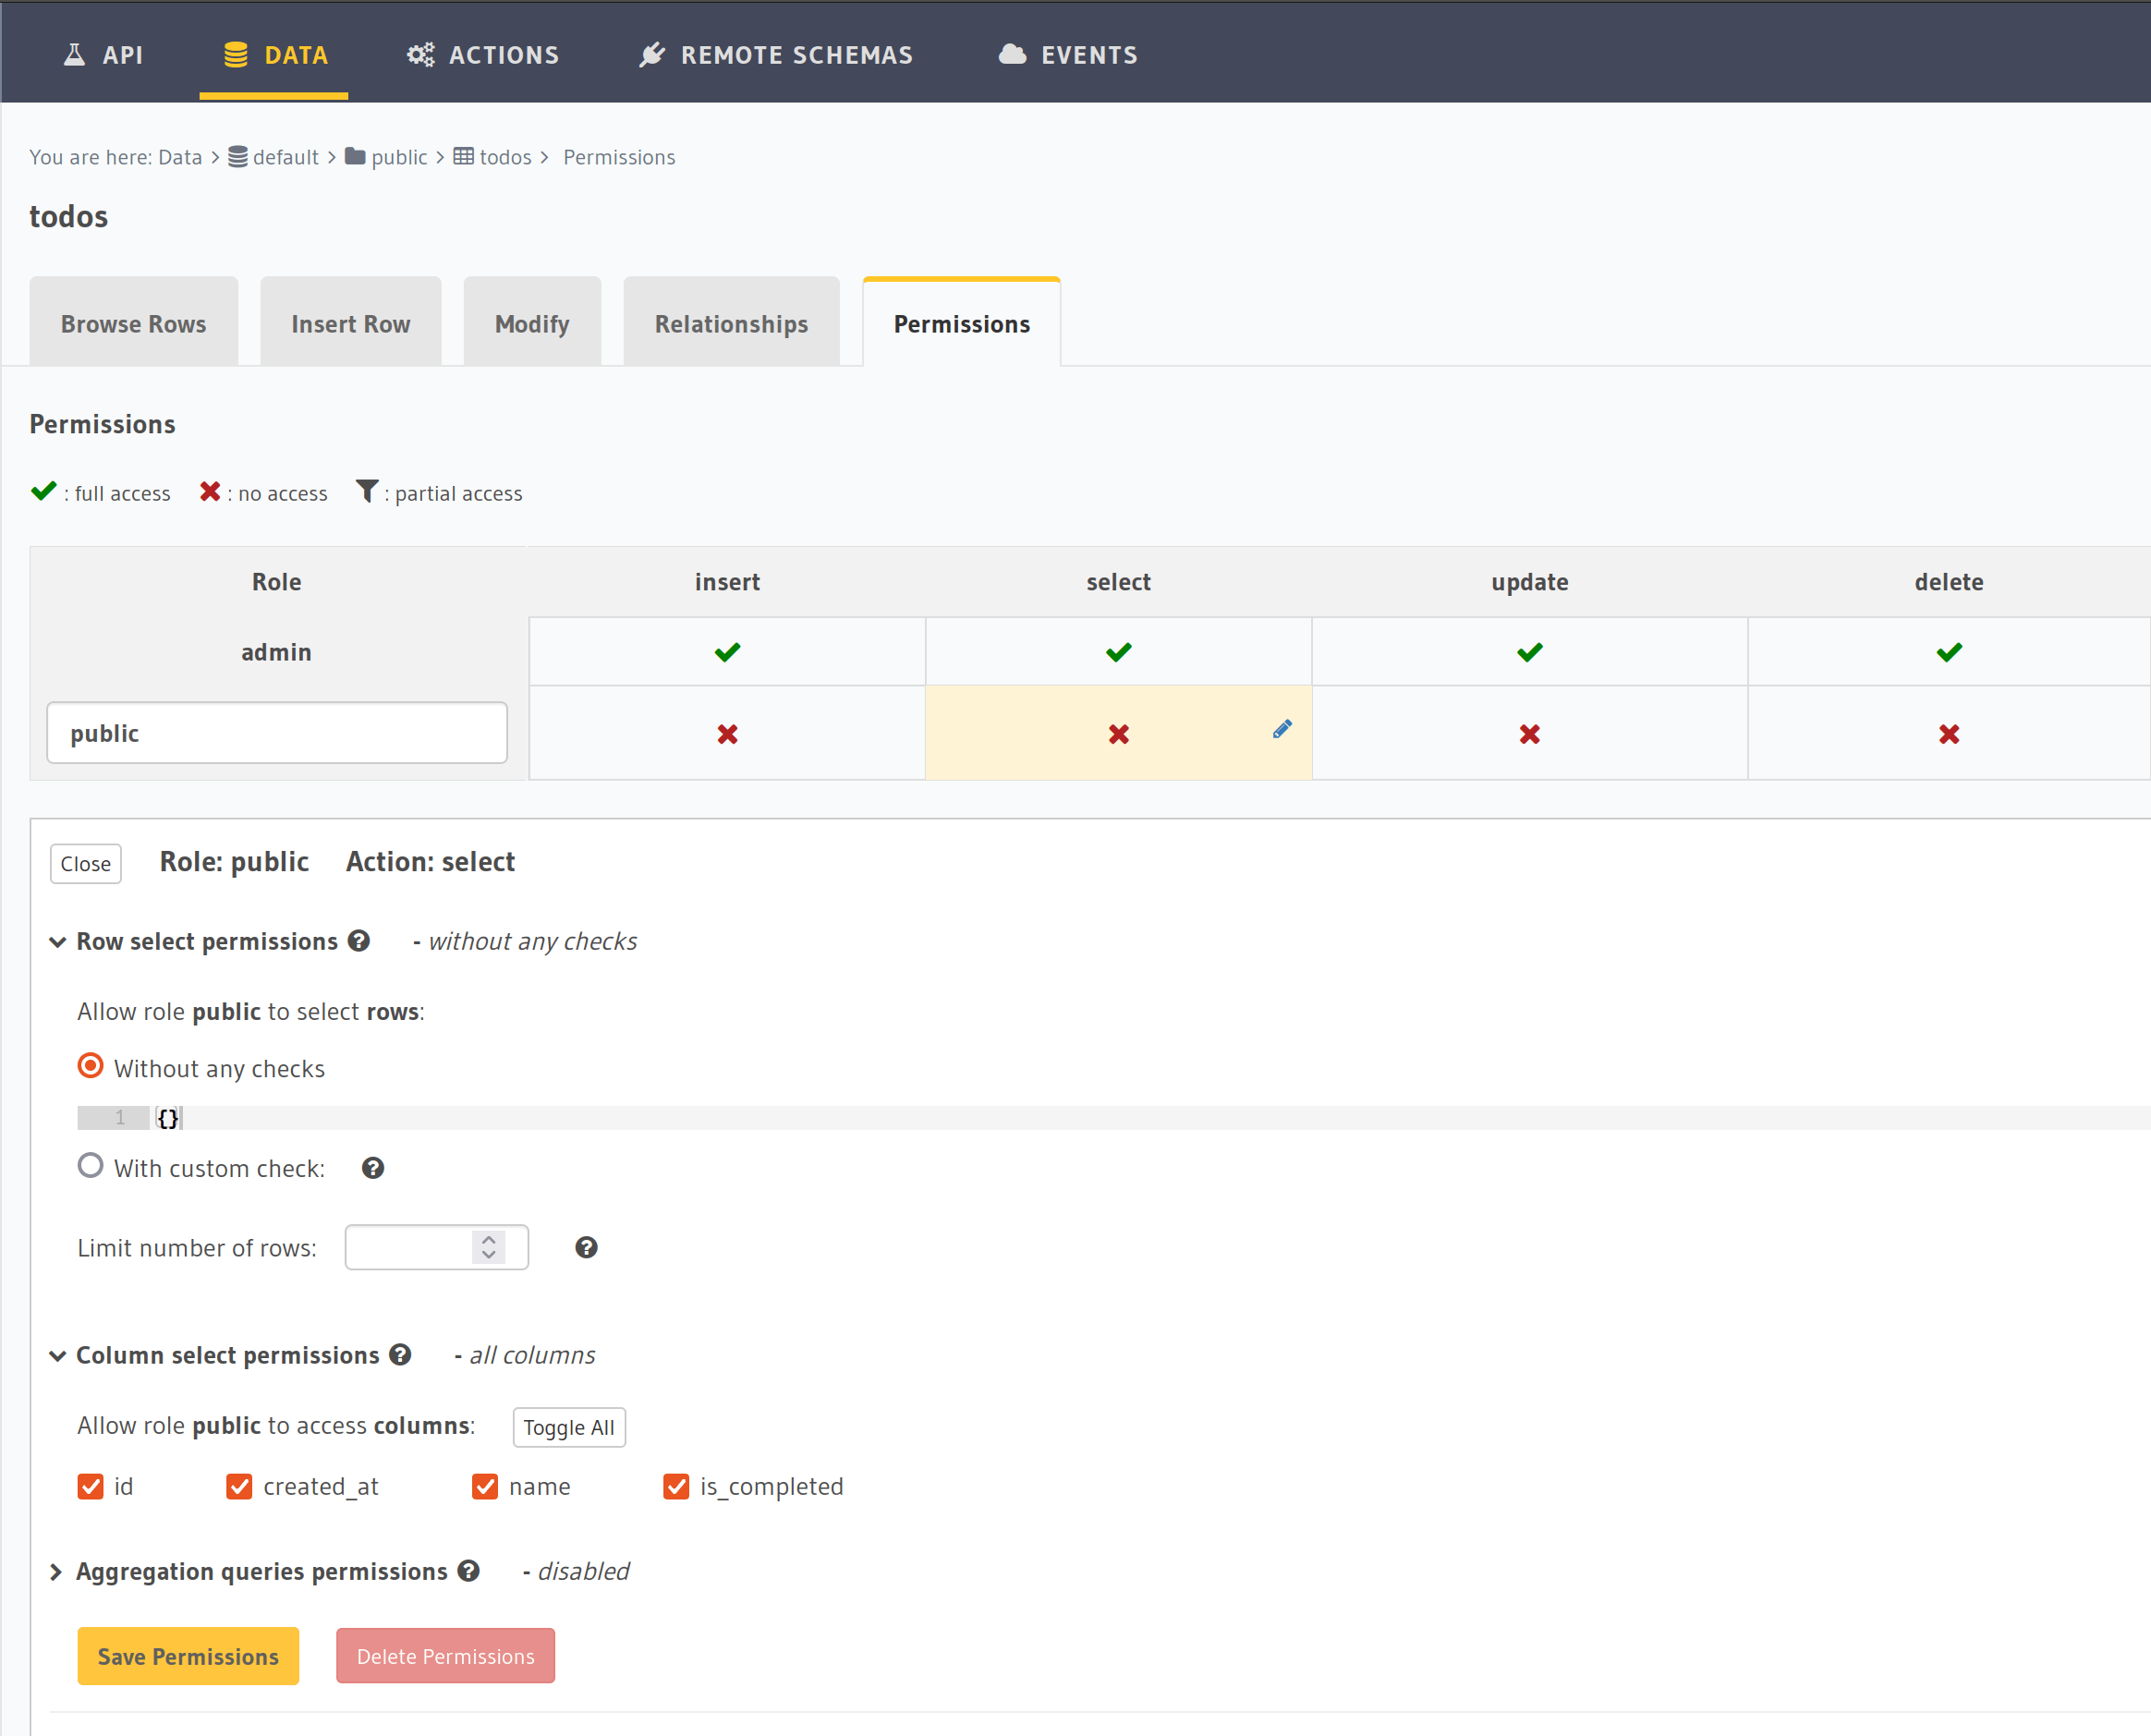
In Hasura Console, go to the Data tab, click on the todos table, then click Permissions. Add a new role called public and click on select. The permission options for the select operation show up below.
Add the following permissions:
 Public role
Rerun the program. Now you see all todos.
_18➜ node index.js_18_18{_18 "todos": [_18 {_18 "id": "558b9754-bb18-4abd-83d9-e9056934e812",_18 "created_at": "2021-12-01T17:05:09.311362+00:00",_18 "name": "write docs",_18 "is_completed": false_18 },_18 {_18 "id": "480369c8-6f57-4061-bfdf-9ead647e10d3",_18 "created_at": "2021-12-01T17:05:20.5693+00:00",_18 "name": "cook dinner",_18 "is_completed": true_18 }_18 ]_18}
There are two reasons why the request succeeded:
- Nhost sets the
publicrole for every unauthenticated GraphQL request. - You explicitly defined permissions for the
publicrole.
It is essential to understand that Hasura has an allow nothing by default policy to ensure that only roles and permissions you define explicitly have access to the GraphQL API.
To implement an app for managing a todo list, let's ensure we have database tables for storing todos and users.
Open Hasura Console
Hasura generates real-time GraphQL APIs, but it also provides a web console for manipulating the schema and data of your database.
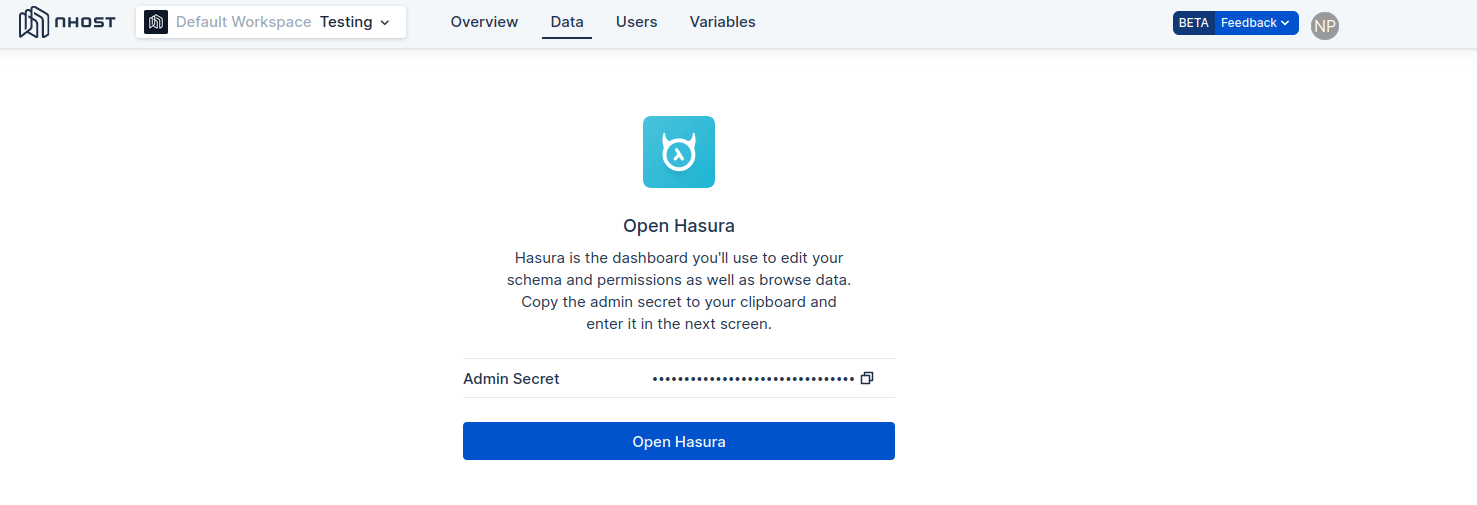
Go to the Data tab on your app's dashboard and select Open Hasura. Remember to copy the admin secret.
The Hasura Console of your app's dedicated Hasura instance will open in a new tab. You can use Hasura Console to manage your app's schema, data, permissions, and event triggers.
 Data -> Open Hasura
Users table
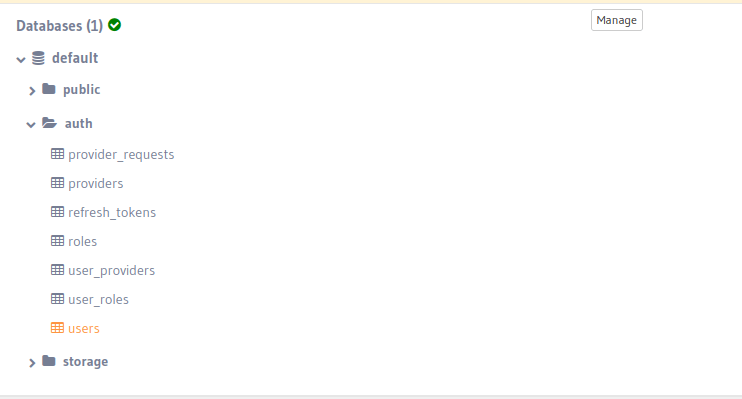
You should see all your database tables on the left-hand side of the screen. You should see multiple different schemas displayed as folders:
publicschema for your app's custom tablesauthandstorageschemas for Nhost's user management and file storage
If you open the auth schema, you'll see that your app already has a users table, so you don't have to create one.
 To store the users, we already have a users table from the auth schema
Create todos table
In Hasura Console, go to the data tab, then click Create Table. Name this table todos.
Add frequently used columns
id and created_at columns are standard and can be added with two clicks. Click Frequently used columns and create them:
id(UUID)created_at(timestamp)
Using frequently used columns ensures the columns get the right name, type, and default value.
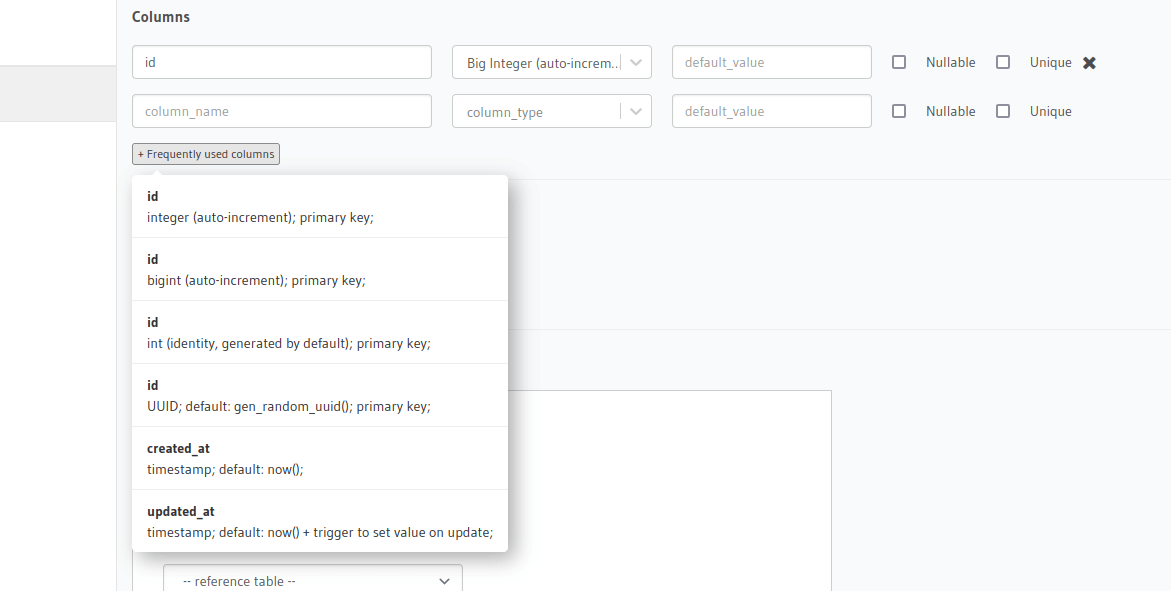 Frequently used columns in the Hasura console
Add custom columns
Add two more columns manually:
name(text)is_completed(boolean)
Make sure to set the default value of is_completed to false.
 Create a table in the Hasura console
This is all we need! A new table will be created when you click Add Table.
Insert data
Go to the Insert Row tab to add some data to your database.
Query data
Now that we have data in our database, we can retrieve it via a GraphQL API. Go to the API tab in the main menu. You can use this view to make GraphQL requests that query or mutate data in your database.
Paste the following GraphQL query into the form and press the Play button:
_10query {_10 todos {_10 id_10 created_at_10 name_10 is_completed_10 }_10}
You should see the todos you just inserted show up as output on the right-hand side.
Admin role
All requests in the Hasura Console use the admin role by default. This role has access to all tables and permissions.
Authentication
In the previous section, you defined select permissions for the public role. You will now add insert and select permissions for authenticated users to secure your app's GraphQL API with authentication.
Nhost's authentication service lets you deliver frictionless registration and login experiences to your users. We support most social providers and different methods such as email & password and passwordless (magic link).
Insert a test user
Manually create a user by going to your app's Users tab (top menu) and clicking on Add User.
You will now use that newly created user. We'll use this newly created user to make authenticated requests to the GraphQL API.
Sign in and query data
Add the following code to sign in the new user and request the list of todos again:
_30import { NhostClient } from '@nhost/nhost-js'_30_30const nhost = new NhostClient({_30 backendUrl: 'https://[app-subdomain].nhost.run',_30})(async () => {_30 // Sign in user_30 const signInResponse = await nhost.auth.signIn({_30 email: 'joe@example.com',_30 password: 'securepassword',_30 })_30_30 // Handle sign-in error_30 if (signInResponse.error) {_30 throw signInResponse.error_30 }_30_30 // Get todos_30 const todos = await nhost.graphql.request(`_30 query {_30 todos {_30 id_30 created_at_30 name_30 is_completed_30 }_30 }_30 `)_30_30 console.log(JSON.stringify(todos.data, null, 2))_30})()
Why is the return value null? Because when making GraphQL requests as an authenticated user, the user role is assumed.
For authenticated requests, there is always the option to override the default
userrole with any other valid role.
To prepare our database and GraphQL API to work for signed-in users we need to do two things:
- Add a
user_idcolumn to thetodostable, so we know what todo belongs to which user. - Use the
userrole instead of thepublicrole for permissions.
Add user_id column
Before adding the user_id column, let's delete all existing todos.
Then add the user_id column as a UUID type. Make sure that nullable is not checked. This will ensure that all todos must have a user_id value.
At last, we'll create a connection between the todos table and the users table. For that, we need to do yet another two things:
- Create a Foreign Key (FK) between
todosandauth.users.id. - Let Hasura track the relationship between the two tables.
Create FK
Create a FK between the auth.users.id column and the public.todos.user_id column. See video above.
Track relationship
Click on the public schema and track the untracked foreign key relationship. Then click on the auth schema and track the relationship again. See video above.
We track these relationships to create the GrpahQL relationships between the todos table to the users table and the users table to the todos table.
Ok, our user_id column is added and connected correctly. Let's continue with setting permissions for signed-in users.
Permissions for signed-in users
Let us organize the permissions so it works for signed in users too.
Remove permissions for the public role
We won't use the public role anymore, so let's remove all permission for that role.
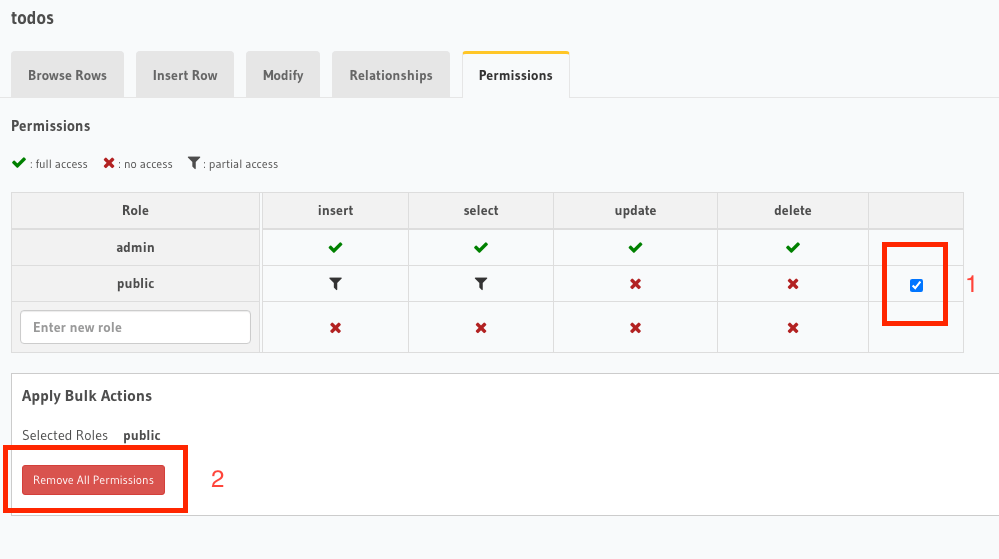 Remove public permissions from Hasura
Now we'll add permissions for the user role.
Signed-in users use the
userrole by default
Insert permission
First, we'll set the Insert permission.
A user can only insert name because all other columns will be set automatically. More specifically, user_id is set to the user's id making the request (x-hasura-user-id) and is configured in the Column presets section. See the image below.
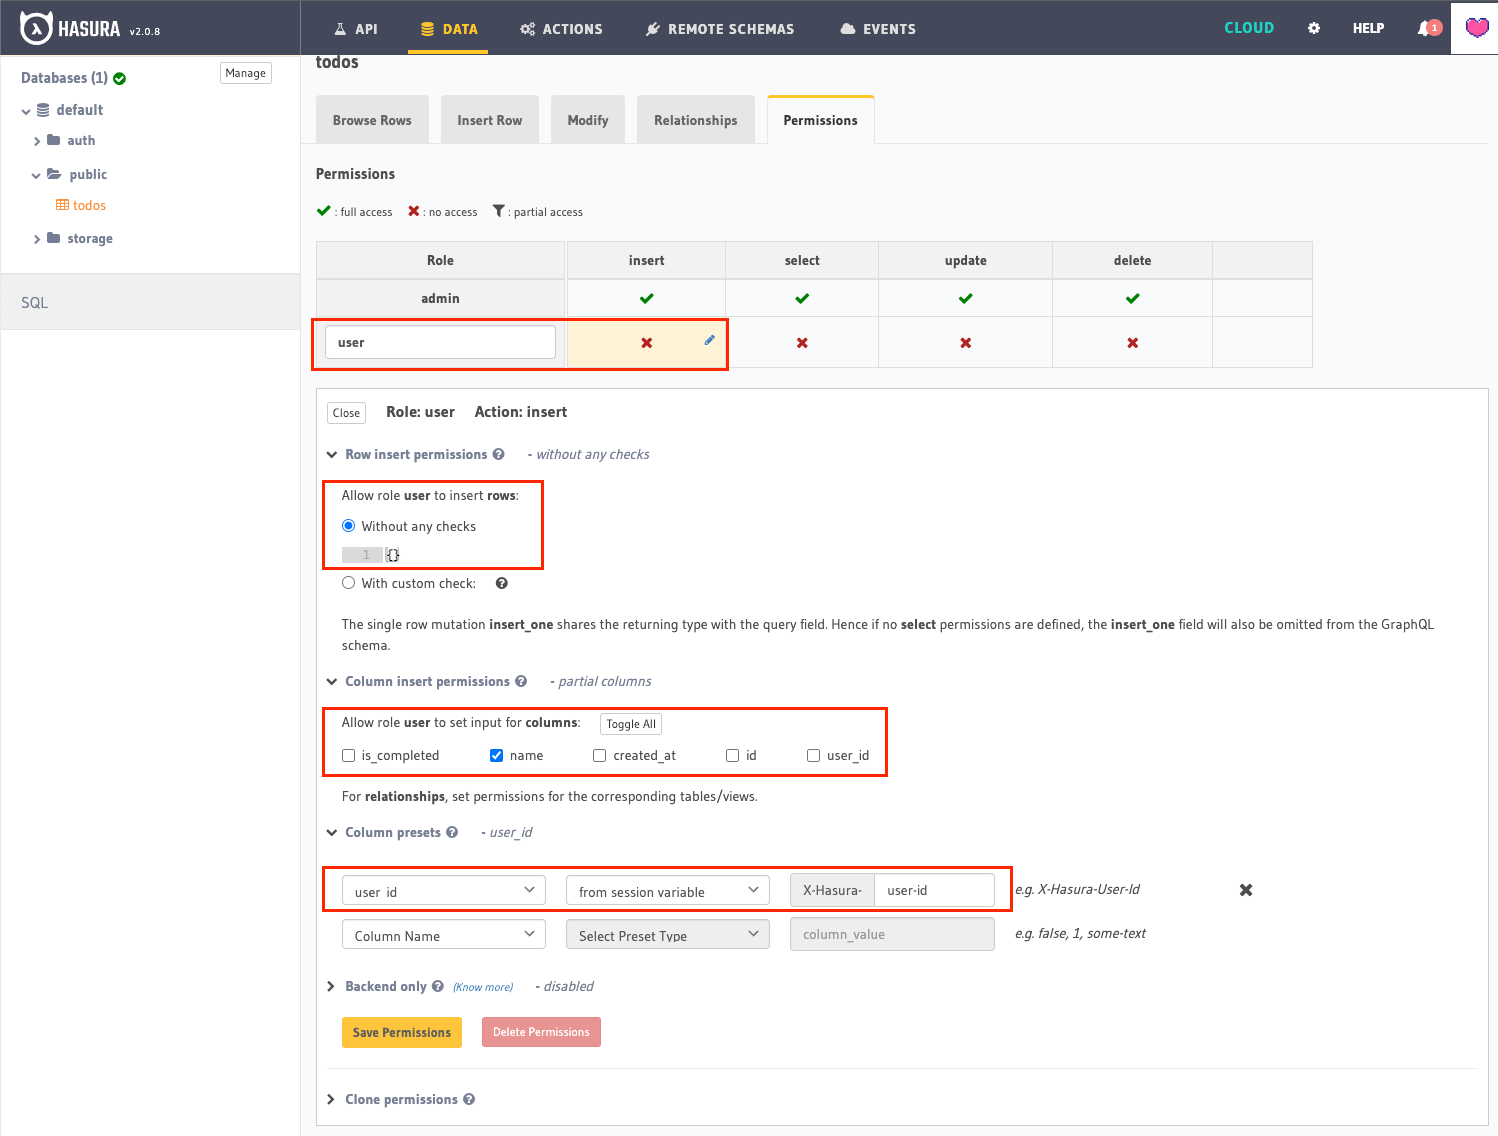 User insert permission
Select permission
For Select permission, set a custom check so users can only select todos where user_id is the same as their user id. In other words: users are only allowed to select their todos. See the image below.
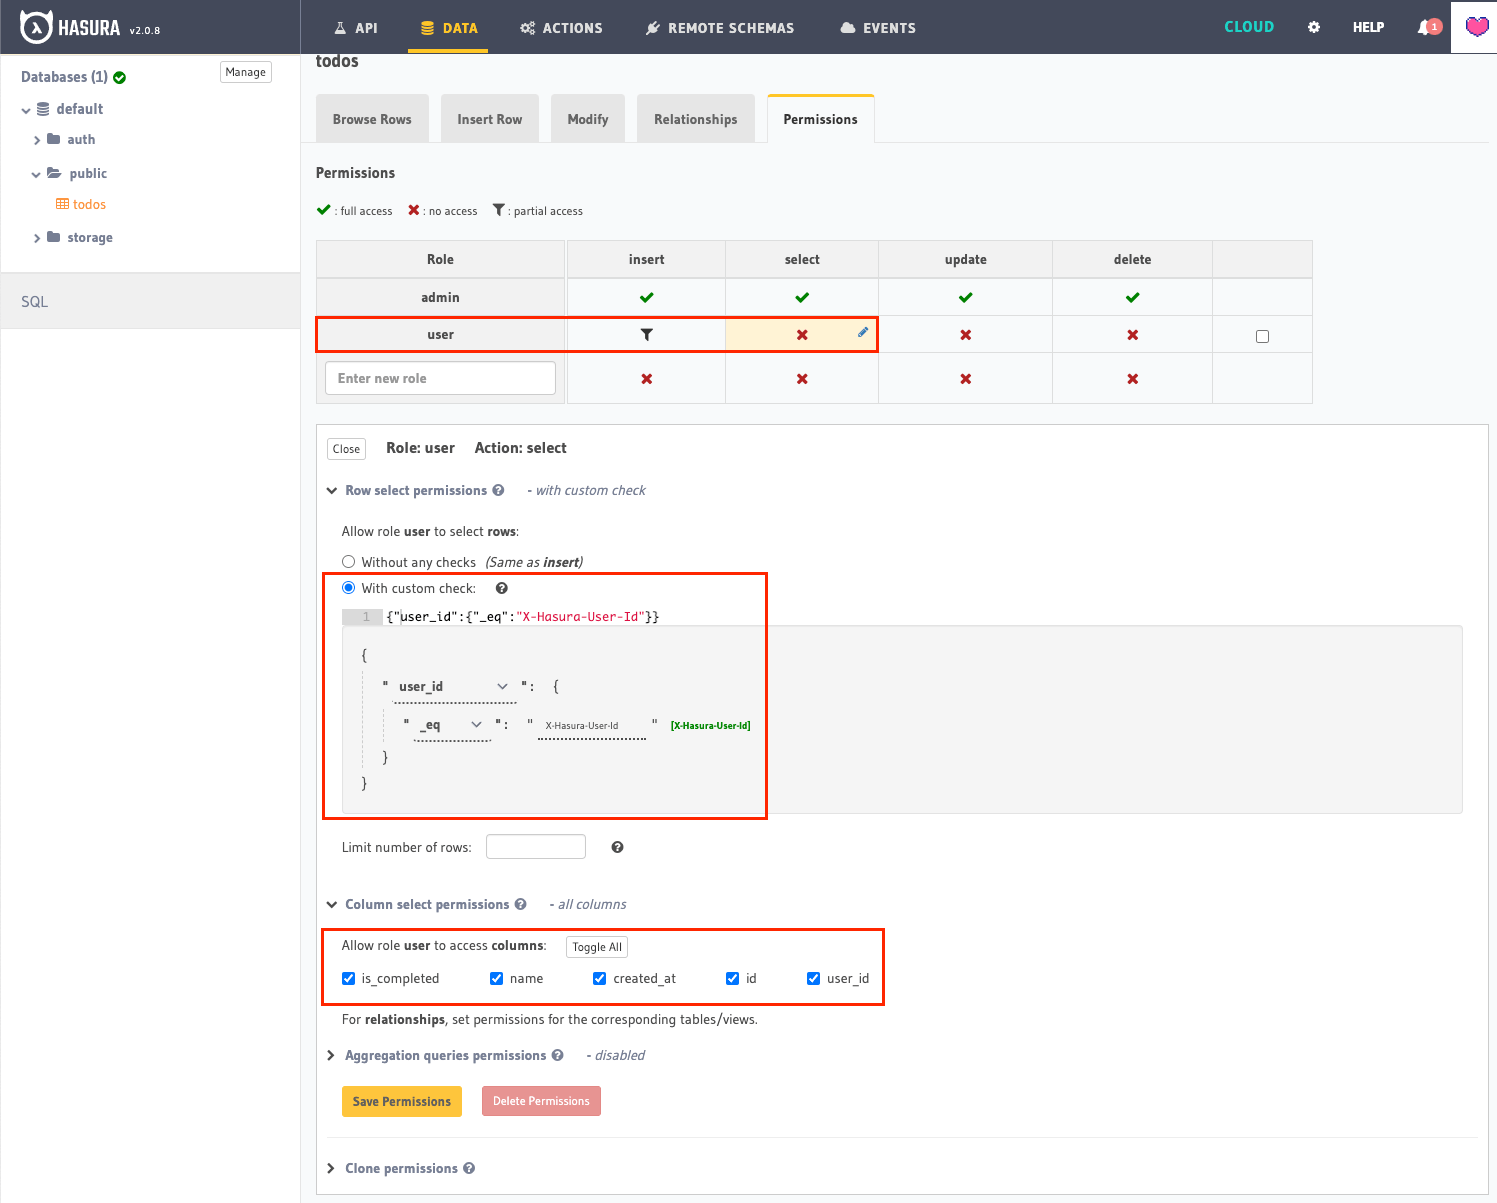 User select permission
Now rerun the app. New todos are inserted, and only todos for the user are fetched and displayed. Your backend is successfully secured!
Share this post