How to use GraphQL Code Generator with React Query
19 July 2022


GraphQL is a great way to build apps faster. But, if you're using GraphQL without a GraphQL Code Generator (codegen) you're missing out on the full potential of GraphQL in your development setup.
In this blog post, you'll learn how to use the missing piece (GraphQL Code Generator) to unleash the full potential of GraphQL with React, React Query v4, and TypeScript.
Using GraphQL Code Generator, we'll generate Typed Queries, Mutations, and, Subscriptions. This will enable us to have up-to-date typings and autocompletion on all queries, mutations, and, subscription variables and results in our code.
Let's get started.
Setup
Three simple steps are required to set up GraphQL Code Generator:
- Install a few npm packages.
- Create a GraphQL Code Generator configuration file.
- Add a GraphQL Code Generator script to the
package.jsonfile.
Install NPM packages
Install the following npm packages required to run GraphQL Code Generator.
_10npm install graphql_10npm install -D typescript @graphql-codegen/cli @graphql-codegen/client-preset @graphql-typed-document-node/core_10# or yarn_10yarn add graphql_10yarn add -D typescript @graphql-codegen/cli @graphql-codegen/client-preset @graphql-typed-document-node/core_10# or pnpm_10pnpm add graphql_10pnpm add -D typescript @graphql-codegen/cli @graphql-codegen/client-preset @graphql-typed-document-node/core
Create a Config File for GraphQL Code Generator
Next, create a codegen.ts configuration file next to your package.json file.
This configuration file contains information about:
- GraphQL API URL.
- GraphQL API headers.
- Where GraphQL queries and mutations exist in your code.
Update the file with your GraphQL endpoint and headers. Here's an example:
_23import { CodegenConfig } from '@graphql-codegen/cli'_23_23const config: CodegenConfig = {_23 schema: [_23 {_23 'http://localhost:1337/v1/graphql': {_23 headers: {_23 'x-hasura-admin-secret': 'nhost-admin-secret',_23 },_23 },_23 },_23 ],_23 ignoreNoDocuments: true,_23 generates: {_23 './src/gql/': {_23 documents: ['src/**/*.tsx'],_23 preset: 'client',_23 plugins: [],_23 },_23 },_23}_23_23export default config
This example configuration file is for a Nhost project using Hasura. We've set the GraphQL endpoint to http://localhost:1337/v1/graphql and added the x-hasura-admin-secret header so the GraphQL Code Generator can introspect the GraphQL API as an admin to get all queries and mutations available.
GraphQL autocomplete in VS Code
This step is optional but highly recommended.
You can get autocomplete when writing GraphQL queries and mutations in VS Code. This is another great way to improve your development workflow and reduce errors caused by typos.
 GraphQL inline autocomplete
To get inline autocomplete when you're writing GraphQL in VS Code, install the GraphQL for VSCode extension and add the following configuration (graphql.config.yaml) file next to your package.json file:
_10schema:_10 - http://localhost:1337/v1/graphql:_10 headers:_10 x-hasura-admin-secret: nhost-admin-secret
Add a Codegen Script to package.json
As the last step, add a script to the package.json to run the GraphQL Code Generator.
_10{_10 /*...*/_10 "scripts": {_10 /*...*/_10 "codegen": "graphql-codegen"_10 }_10 /*...*/_10}
You'll run this script (npm run codegen) every time you've changed anything in your GraphQL API or in your GraphQL files to get the most up-to-date types generated. You can also run the script in watch mode to automatically generate new types when you change your code using npm run codegen -w.
You've now completed the three configuration steps. It's time to start using the GraphQL Code Generator and unleash its power!
Workflow
As a mental model, this is how you will use the GraphQL Code Generator in your development workflow:
- Run
npm run codegen -win watch mode to automatically generate types for queries, mutations, and subscriptions. - Write GraphQL queries and mutations and wrap the GraphQL code with the
graphql()function. - Use the generated types to get autocompletion and type safety.
The graphql() function is generated by the GraphQL Code Generator and located at src/gql/gql.
Here's an example of how to write a GraphQL query and wrap it with the graphql() function:
_11import { graphql } from '../gql/gql'_11_11const GET_TASKS = graphql(`_11 query GetTasks {_11 tasks(order_by: { createdAt: desc }) {_11 id_11 name_11 done_11 }_11 }_11`)
Example: Todo App
We'll now go through two examples of how to use the GraphQL Code Generator setup with React Query in a Todo App. The first example is by using a query to fetch data and the other example is to use a mutation to modify data.
The full source code can be found on GitHub - GraphQL Code Generator Example with React Query. This blog post contains a subset of the code to give you a basic understanding of how to use GraphQL Code Generator with React Query.
For the two examples, we're using a table tasks in Hasura with three columns:
- id - UUID
- name - Text
- done - Boolean
App Setup
Install React Query and graphql-request.
_10npm install @tanstack/react-query graphql-request_10# or yarn_10yarn add @tanstack/react-query graphql-request_10# or pnpm_10pnpm add @tanstack/react-query graphql-request
Why do we install graphql-request?
React Query is agnostic to how data is queried and mutated. We need to implement the
queryFnandmutationFnourselves. We'll use graphql-request to send the GraphQL requests.
Let's continue by first setting up the React Query client in our app. After that, we'll configure the graphql-request client.
React Query Client
In src/utils/react-query-client.ts we create a QueryClient that is used by React Query.
_10import { QueryClient } from '@tanstack/react-query'_10_10export const queryClient = new QueryClient()
GraphQL Client
In src/utils/graphql-client.ts we create our GraphQL client using graphql-request. In this example, we're adding an authorization header using the Nhost JavaScript client.
_21import { nhost } from './nhost'_21import { GraphQLClient } from 'graphql-request'_21_21type AuthHeaderProps = {_21 authorization?: string_21}_21_21export const gqlClient = new GraphQLClient(nhost.graphql.getUrl(), {_21 headers: () => {_21 const authHeaders = {} as AuthHeaderProps_21_21 if (nhost.auth.isAuthenticated()) {_21 authHeaders['authorization'] = `Bearer ${nhost.auth.getAccessToken()}`_21 }_21_21 return {_21 'Content-Type': 'application/json',_21 ...authHeaders,_21 }_21 },_21})
App
React Query requires a QueryClient and a QueryClientProvider. This is how to set it up in e.g. App.tsx:
_17import { QueryClientProvider } from '@tanstack/react-query'_17_17import { queryClient } from './utils/react-query-client'_17import { Tasks } from './components/Tasks'_17_17function App() {_17 return (_17 <QueryClientProvider client={queryClient}>_17 <div>_17 <div>Todo App</div>_17 <Tasks />_17 </div>_17 </QueryClientProvider>_17 )_17}_17_17export default App
Get Tasks (GraphQL Query)
As we mentioned under the Workflow section above, we use the three-step process when using GraphQL Code Generator.
Just to repeat, these are the three steps:
- Run
npm run codegen -win watch mode to automatically generate types for GraphQL queries, mutations, and subscriptions. - Write GraphQL queries and mutations and wrap the GraphQL code with the
graphql()function. - Use the generated types to get autocompletion and type safety.
Let's get going.
Run the codegen to automatically generate types:
_10npm run codegen -w
Next, we'll combine the graphql() function with the useQuery() and GraphQL Request hook to fetch the data.
_49import { useMutation, useQuery } from '@tanstack/react-query'_49_49import { graphql } from '../gql/gql'_49import { gqlClient } from '../utils/graphql-client'_49_49const GET_TASKS = graphql(`_49 query GetTasks {_49 tasks(order_by: { createdAt: desc }) {_49 id_49 name_49 done_49 }_49 }_49`)_49_49export function Tasks() {_49 const { data, isLoading, isError, error } = useQuery({_49 queryKey: ['tasks'],_49 queryFn: async () => {_49 return gqlClient.request(GET_TASKS)_49 },_49 })_49_49 if (isLoading) {_49 return <div>Loading...</div>_49 }_49_49 if (isError) {_49 console.error(error)_49 return <div>Error</div>_49 }_49_49 if (!data) {_49 return <div>No data</div>_49 }_49_49 const { tasks } = data_49_49 return (_49 <div>_49 <h2>Todos</h2>_49 <ul>_49 {tasks.map((task) => (_49 <li key={task.id}>{task.name}</li>_49 ))}_49 </ul>_49 </div>_49 )_49}
That's it. In this scenario, using Nhost, you now have type-safety from Postgres, to GraphQL to TypeScript. From your database to your frontend. Good job!
Now, let's see some benefits of this setup!
If you're trying to access a property on tasks that does not exist, TypeScript will throw an error. E.g. if you're trying to access task.age.
_10src/components/Tasks.tsx:160:44 - error TS2339: Property 'age' does not exist on type '{ __typename?: "tasks" | undefined; id: any; name: string; done: boolean; }'._10_10160 <div className={style}>{task.age}</div>_10 ~~~_10_10_10Found 1 error in src/components/Tasks.tsx:160
NOTE: If you're using Vite remember that Vite does not perform type checking. You need to run
tsc -noEmitto see any TypeScript errors.
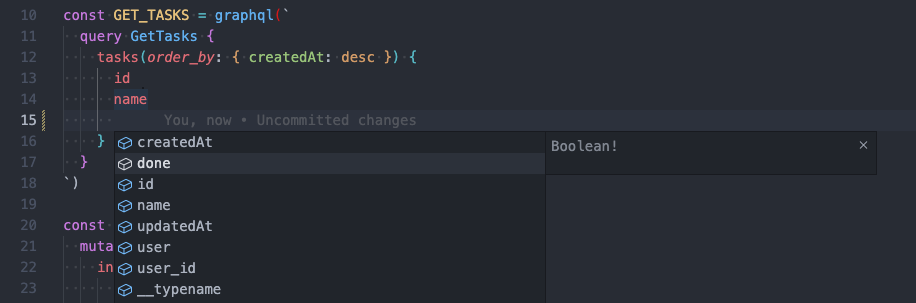
If you're using VS Code you also see the TypeScript error while you're coding:
 VS Code shows TypeScript errors
TypeScript also knows that task.name is of type string, which it has inferred from Postgres ( the task.name column is of type text) and GraphQL (task.name is of type String). This means you can't use task.name to perform arithmetic operations.
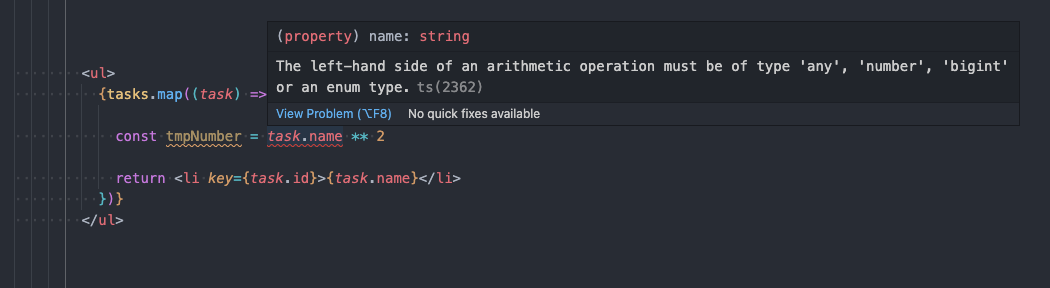 VS Code shows another TypeScript error.
As you see, with the GraphQL Code Generator (and Postgres, GraphQL, and TypeScript) you're less likely to run into type errors. Overall, your application becomes more robust with fewer bugs.
Let's continue and see how to use GraphQL Code Generator with GraphQL mutations.
Insert Task (Mutation)
Specify the GraphQL mutation and wrap it around the graphql() function.
Next, specify the mutation in the useMutation hook. The mutationFn is the function that will be called when the mutation is triggered. If the mutation is successful, the onSuccess function will be called where we invalidate the tasks query to refetch the data.
Now you can use the insertTask function to trigger the mutation.
_83import { useState } from 'react'_83import { useMutation, useQuery } from '@tanstack/react-query'_83_83import { graphql } from '../gql/gql'_83import { gqlClient } from '../utils/graphql-client'_83import { queryClient } from '../utils/react-query-client'_83_83const INSERT_TASK = graphql(`_83 mutation InsertTask($task: tasks_insert_input!) {_83 insertTasks(objects: [$task]) {_83 affected_rows_83 returning {_83 id_83 name_83 }_83 }_83 }_83`)_83_83export function NewTask() {_83 const [name, setName] = useState('')_83_83 const insertTask = useMutation({_83 mutationFn: (name: string) => {_83 return gqlClient.request(INSERT_TASK, {_83 task: {_83 name,_83 },_83 })_83 },_83 onSuccess: () => {_83 queryClient.invalidateQueries(['tasks'])_83 },_83 })_83_83 const handleSubmit = async (e: React.FormEvent<HTMLFormElement>) => {_83 e.preventDefault()_83_83 if (!name) {_83 return_83 }_83_83 try {_83 await insertTask.mutate(name)_83 setName('')_83 alert('Task added!')_83 } catch (error) {_83 return console.error(error)_83 }_83 }_83_83 return (_83 <div>_83 <h2>New Task</h2>_83 <div>_83 <form onSubmit={handleSubmit} className="space-y-4">_83 <div>_83 <label_83 htmlFor="email"_83 className="block text-sm font-medium text-gray-700"_83 >_83 Todo_83 </label>_83 <div className="mt-1">_83 <input_83 type="text"_83 placeholder="Todo"_83 value={name}_83 onChange={(e) => setName(e.target.value)}_83 />_83 </div>_83 </div>_83 {isError && <div>Error: {JSON.stringify(error, null, 2)}</div>}_83 <div>_83 <button type="submit" disabled={insertTask.isLoading}>_83 Add_83 </button>_83 </div>_83 </form>_83 </div>_83 </div>_83 )_83}
GitHub Repository
The example code for this blog post is on GitHub - GraphQL Code Generator Example with React Query.
Summary
That's it. You've now a basic understanding of how to set up and use GraphQL Code Generator with React Query. This will help you build robust applications with fewer bugs. Good luck!
What's next?
Did you enjoy this blog post?
Share this post